Quantcast
Channel: Yet Another Tridion Blog
Viewing all 215 articles
Browse latest View live

Toolkit - Writing My Own Database Engine

$
0
0
This post if part of a series about the File System Toolkit - a custom content delivery API for SDL Tridion.

In the previous post Criteria for Dynamic Queries, I presented index classes that allow us to execute performant lookups for keys in indexes on the file system. This post presents the logic behind these indexes.

The requirement for the Toolkit API was not to use a database or a third party product such as search engines or indexers. In order to do searches for content on a file system where we had JSON files filled with properties we want to search on, we need to have indexes of those properties. It would be impossible to do performant searches without such indexes. This meant creating my own indexes and indexing logic (put, get) backed by a fast searching algorithm. In other words, it meant writing my own simple database engine.

The rationale looks like this:
  • Each query must be as fast as possible. The fastest way to query would be to lookup a key in a dictionary and to retrieve the associated value. For large collections, this can't be done in memory; therefore we must have our dictionary on disk as a file. That's something we don't have out of the box.
  • In order to retrieve values fast, we need to do a binary search. This requires the list of keys to be ordered, let's say in ascending order. Next to the key we need, there is a list of values. Each value represents the TcmUri of the item we need. As such we need an index file containing key-value tuples, ordered ascending by key.
  • The index can change at any moment due to publish/unpublish activities. New items must be inserted at the right location in the index in order to maintain its ascending property. Removing items will either remove a value from the list of values associated to a key or, if the last value of a key is removed, it will remove the key entry as well.
For example consider we have a CustomMeta Key-StringValue index. It must contain as index key the concatenation of CustomMeta key with CustomMeta string-value. The index values associated with this index key are the list of TcmUris of items that contain such CustomMeta.

Component tcm:1-2 with CustomMeta key=Type, value=Article would be represented in the index as:
TypeArticle=tcm:1-2

Component tcm:1-3 with the same CustomMeta key=Typevalue=Article would be represented in the index as:
TypeArticle=tcm:1-3

When indexing both Components, the index would have the following entry:
TypeArticle=tcm:1-2,tcm:1-3

Other Components in the index would be represented according to their CustomMeta. For example:
TypeArticle=tcm:1-2,tcm:1-3
TypeProduct=tcm:1-4

The index is ordered ascending according to the index key (i.e. TypeArticle, TypeProduct).

The same Component might appear several times in the index, but next to other CustomMeta key-value entries:
AuthorJohn=tcm:1-2
TypeArticle=tcm:1-2,tcm:1-3
TypeProduct=tcm:1-4

Component tcm:1-2 has both CustomMeta Type=Article and Author=John. Hence it appears in the index twice.

Index lookups are done using binary search for a key-value tuple. For example, a query for CustomMeta key=Type and value=Article, results in an index lookup for TypeArticle, which yields tcm:1-2 and tcm:1-3.

IndexAbstract Class

The base class of the index implementation offers the following operations. The write operations put, remove are performed by the Deployer extension only. The get operations are performed mainly by the dynamic query criteria:

publicabstract Set<String>get(String key);
publicabstract Set<String>get(String key, Filter filter);
publicabstract Set<String>get(String startKey, String endKey, Filter filter);
publicabstractbooleanput(String key, String value);
publicabstractbooleanremove(String key);
publicabstractbooleanremove(String key, String value);

IndexImpl Class

The class offers an implementation of the get, put, remove methods in IndexAbstract. The simplest get(String) method retrieves all values associated to an index key.

public Set<String>get(String key, Filter filter){
RandomAccessFile raf =new RandomAccessFile(file,"rw");
FileChannel fileChannel = raf.getChannel();

IndexEntry indexEntry = binarySearch(fileChannel, key, filter);
return indexEntry.getValues();
}

The binarySearch method performs a binary search on a given random access file. The file is the index file. The returned IndexEntry contains the key and values objects read from the index, as well as the start and end positions in the index file where the index entry is located.

In order to make the index lookup perform fast, we need to read parts of the index in memory for faster access. Java offers a neat feature for this called MappedByteBuffer where one can map part of a file to memory. All file operations would then be performed in memory instead, yielding a great performance boost. More information about memory buffer is available in follow-up post Tricks with Memory Byte Buffer.

private IndexEntry binarySearch(FileChannel fileChannel, String key, Filter filter){
MemoryBuffer buffer = MemoryBufferFactory.INSTANCE.getBuffer(fileChannel,
FileChannel.MapMode.READ_ONLY);
returnbinarySearch(buffer, key, filter,0, buffer.capacity());
}

The binarySearch method below is the one that performs the actual binary search. Given the nature of the random access file, we don't know where in the file a certain index entry begins. Each index entry has an arbitrary length due to its number of TcmUris in the value, so we can't know where it ends. Therefore, the binary search algorithm must be adapted a bit in order to work.

private IndexEntry binarySearch(MemoryBuffer buffer, String key, Filter filter,long low,long high){
if(low > high){
returnnewIndexEntry(key, low);
}

long middle =(low + high)>>>1;
IndexEntry indexEntry = readIndexEntry(buffer, key, middle, filter);
if(indexEntry.isEmpty()){
return indexEntry;
}

int compare = compareKey(key, indexEntry.getKey());
if(compare ==0){
return indexEntry;
}elseif(compare >0){
returnbinarySearch(buffer, key, filter, indexEntry.getEndPosition()+1, high);
}else{
returnbinarySearch(buffer, key, filter, low, indexEntry.getStartPosition()-1);
}
}

When we perform the middle split in binary search, we need to know which entry is at that position. We need to find where the beginning of that index entry is, because that is where we read the index key from. The method readIndexEntry reads backwards in the index from the 'current' position until it finds the 'entry-separator' -- i.e. a special character that delimits two index entries.

The index file format of an index entry is the following:
key KeySeparator value ValueSeparator value EntrySeparator
where there can be a variable number of values and each separator is a standard ASCII character.

The compareKey method above performs a comparison between the searched key and the found key. If they are the same, the binary search found the index entry we want. If they are different, the binary search continues on the left/right partitions.

Toolkit - Tricks with Memory Byte Buffer

$
0
0
This post if part of a series about the File System Toolkit - a custom content delivery API for SDL Tridion.

In previous post Writing My Own Database Engine, I quickly mentioned the use of Memory Byte Buffer from Jana NIO that provides fast access to a file by mapping its content to memory. This post goes into more detail over some tricks that occurred with that implementation.

There is an issue with Memory Byte Buffer. Namely, once it is created by calling FileChannel.map method, it cannot be unmapped, closed or discarded. The byte buffer will exist until it is garbage collected.

From the JavaDoc:

A mapping, once established, is not dependent upon the file channel that was used to create it. Closing the channel, in particular, has no effect upon the validity of the mapping.

A mapped byte buffer and the file mapping that it represents remain valid until the buffer itself is garbage-collected.


The issue is affects Windows OS Java implementations, in the sense that it keep portions of the mapped file open and unavailable to modifications. The index file must be modifiable at any time because of publish/unpublish activities that must be able to modify the index.

Attempting to modify the index file on Windows OS will result in a FileNotFoundException (The requested operation cannot be per formed on a file with a user-mapped section open)

In order to work around this issue, I created a big hack. I created my own factory that creates and destroys MemoryByteBuffers.

publicenum MemoryBufferFactory {

INSTANCE;
MemoryBufferFactory(){
}

public MemoryBuffer getBuffer(FileChannel fileChannel, FileChannel.MapMode mode)throws IOException {
returnnewMappedMemoryBuffer(fileChannel, mode);
}
}

The MemoryBuffer is a interface that defines the operations on a wrapped byte buffer:

publicinterfaceMemoryBuffer{
intcapacity();
byteget(int position);
voidclose();
}

The MappedMemoryBuffer implements the MemoryBuffer interface and wraps a java.nio.MappedByteBuffer object. The only trick it does is that in its close() method, it calls an unsupported, private unmap method of the MappedByteBuffer.

publicclassMappedMemoryBufferimplements MemoryBuffer {

privatefinal MappedByteBuffer buffer;
privatefinal FileChannel fileChannel;

publicMappedMemoryBuffer(FileChannel fileChannel, FileChannel.MapMode mode){
this.fileChannel= fileChannel;
buffer = fileChannel.map(mode,0, fileChannel.size());
}

publicintcapacity(){
return buffer.capacity();
}

publicbyteget(int position){
return buffer.get(position);
}

publicvoidclose(){
Class<?> clazz = fileChannel.getClass();
Method method = clazz.getDeclaredMethod("unmap",
new Class[]{MappedByteBuffer.class});
method.setAccessible(true);
method.invoke(null,new Object[]{buffer});
}
}


Unattended SDL Web 8.5 Installation

$
0
0
In a recent project, we had the requirement to install the SDL Web 8.5 Content Manager and the Publisher using script only (aka an unattended installation).

I knew about the existence of such an unattended installation, but I for one, have never attempted it. The feature is clearly documented in http://docs.sdl.com/LiveContent/content/en-US/SDL%20Web-v5/GUID-CE873235-5FE0-489D-A63C-B979919D8F9E.

All the prerequisites must still be fulfilled before the actual unattended installation can take place:

  • In Server Manager:
    • Server Roles:
      • Web Server (IIS)
    • Features:
      • .NET Frameowrk 4.6
        • ASP.NET 4.6
        • WCF Services
          • (all of them, including other features needed as dependencies)
    • Web Server Role (IIS)
      • Role Services
        • Common HTTP Features (all of them)
        • Health & Diagnostics (all)
        • Performance (all)
        • Security (all)
  • Install Java Runtime Environment

Content Manager DB must be created in advance. MTS user must be created in advance.

Once all prerequisites are met, I was able to proceed with the actual unattended installation.

To install the Content Manager, I successfully used the following command inside a .bat file:

D:

mkdir "\Software\log"

del"\Software\log\*.*" /Q

cd"\Software\SDL Web 8.5\SDL Web 8.5\Content Manager"

SDLWeb85CM.exe -s -log "D:\Software\log\install.log" ACCEPT_EULA=true
DB_SERVER=mydb.eu-west-1.rds.amazonaws.com DB_NAME=Tridion_cm DB_USER=TCMDBUser
DB_PASSWORD=dbpass TRIDION_CM_ENVIRONMENT_ID=Tridion_cm_dbblabla
SYSTEM_ACCOUNT_NAME=MTSUser SYSTEM_ACCOUNT_DOMAIN=mydomain
SYSTEM_ACCOUNT_PASSWORD=mypass LICENSE_PATH="D:\Software\licenses\license.xml"
CD_LICENSE_PATH="D:\Software\licenses\cd_licenses.xml" WEB_PORT=80
TTM_DB_SERVER=mydb.eu-west-1.rds.amazonaws.com TTM_DB_NAME=Tridion_Topology
TTM_DB_USER=TTMDBUser TTM_DB_PASSWORD=pass TTM_WEB_PORT=81
INSTALLLOCATION="D:\SDL Web" WEBLOCATION="D:\SDL Web\web"

To install the Content Publisher, I ran the following commands. Note that I had to exclude quite a few features from the installation, in order to _only_ install the Transport and Publisher services:

D:

mkdir "\Software\log"

del"\Software\log\*.*" /Q

cd"\Software\SDL Web 8.5\SDL Web 8.5\Content Manager"

SDLWeb85CM.exe -s -log "D:\Software\log\install.log" ACCEPT_EULA=true
DB_SERVER=mydb.eu-west-1.rds.amazonaws.com DB_NAME=Tridion_cm DB_USER=TCMDBUser
DB_PASSWORD=pass TRIDION_CM_ENVIRONMENT_ID=Tridion_cm_mydb SYSTEM_ACCOUNT_NAME=MTSUser
SYSTEM_ACCOUNT_DOMAIN=mydomain SYSTEM_ACCOUNT_PASSWORD=pass
LICENSE_PATH="D:\Software\licenses\license.xml"
CD_LICENSE_PATH="D:\Software\licenses\cd_licenses.xml"
CdWindowsServices_SelectedFeatures=FeatureTransportService
cm_SelectedFeatures=FeatureContentManager,FeaturePublisherService
CMECore_SelectedFeatures= CMEGui_SelectedFeatures= ContextExpressions_SelectedFeatures=(All)
ExperienceManager_SelectedFeatures= Documentation_SelectedFeatures=
ExternalContentLibrary_SelectedFeatures= SpellChecker_SelectedFeatures= TcmSearch_SelectedFeatures=
TemplateBuilder_SelectedFeatures= TopologyManager_SelectedFeatures=(All)
TTM_DB_SERVER=mydb.eu-west-1.rds.amazonaws.com TTM_DB_NAME=Tridion_Topology
TTM_DB_USER=TTMDBUser TTM_DB_PASSWORD=pass TTM_WEB_PORT=81 INSTALLLOCATION="D:\SDL Web"


AWS RDS Backup Restore

$
0
0
This post describes a backup/restore procedure for the Content Manager database in an Amazon Web Services (AWS) environment). The database is a MSSQL instance running on as Amazon Relational Database Service (RDS).

The existing database is from an SDL Tridion 2013 environment, and as such, after the restore in the new SDL Web 8.5 environment, it will have to be upgraded to SDL Web 8.5.

Performing the backup implies taking the database offline and executing the stored procedure:

exec msdb.dbo.rds_backup_database 'Tridion_cm_2013', 'arn:aws:s3:::mybackup/Tridion_cm_2013.bak'

The procedure is described in http://docs.aws.amazon.com/AmazonRDS/latest/UserGuide/SQLServer.Procedural.Importing.html

Performing the restore implies executing the following stored procedure in the new RDS database:

exec msdb.dbo.rds_restore_database 'Tridion_cm_2013','arn:aws:s3:::mybackup/Tridion_cm_2013.bak',''

While the restore is running, you can track the progress by calling rds_task_status

exec msdb.dbo.rds_task_status @task_id=4

The restore process is quite lengthy, but a log is available in one of the fields returned by rds_task_status:

Task execution has started.
Tridion_cm_2013.bak: Completed processing 5.02%of S3 chunks.
RESTORE DATABASE successfully processed 9358282 pages in1409.730 seconds (51.862 MB/sec).
...
Tridion_cm_2013.bak: S3 processing completed successfully
Command execution completed successfully.

As usual, after restore, the old database logins are not available anymore, because they have been disassociated between the old and new databases instances. The existing TCMDBUser user must be altered in order to associate it with the new TCMDBUser user from the new database:

ALTERUSER TCMDBUser WITH LOGIN=TCMDBUser


Running sp_updatestats on AWS RDS database

$
0
0
Part of the maintenance tasks that I perform on a MSSQL Content Manager database is to run stored procedure sp_updatestats.

exec sp_updatestats

However, that is not supported on an AWS RDS instance. The error message below indicates that only the sa account can perform this:

Msg 15247, Level16, State1, Procedure sp_updatestats, Line 15 [Batch Start Line 0]
User does not have permission to perform this action.

Instead there are several posts that suggest using UPDATE STATISTICS instead: https://dba.stackexchange.com/questions/145982/sp-updatestats-vs-update-statistics

I stumbled upon the following post from 2008 (!!!), https://social.msdn.microsoft.com/Forums/sqlserver/en-US/186e3db0-fe37-4c31-b017-8e7c24d19697/spupdatestats-fails-to-run-with-permission-error-under-dbopriveleged-user, which describes a way to wrap the call to sp_updatestats and execute it under a different user:

createprocedure dbo.sp_updstats
withexecuteas'dbo'
as
exec sp_updatestats
go

grantexecuteon dbo.sp_updstats to [TCMDBUser]
go

exec dbo.sp_updstats

I ran the code above as the RDS admin user and it seemed to work. The output was very similar to what the sp_updatestats would output, so I would conclude it actually worked ;)


Autoscaling Publishers in AWS

$
0
0
This series of blog posts presents in detail the setup of Tridion Publishers autoscaling as implemented for Amazon Web Services (AWS) infrastructure.

Originally, I was inspired by Julian's post about Using AWS to Scale SDL Web Publishers. I used this post to have an initial setup and then I completed it with more features like license management and more monitoring.

These are the steps that I took:


Publishing Queue metrics in CloudWatch

$
0
0
This post is part of a bigger topic Autoscaling Publishers in AWS.

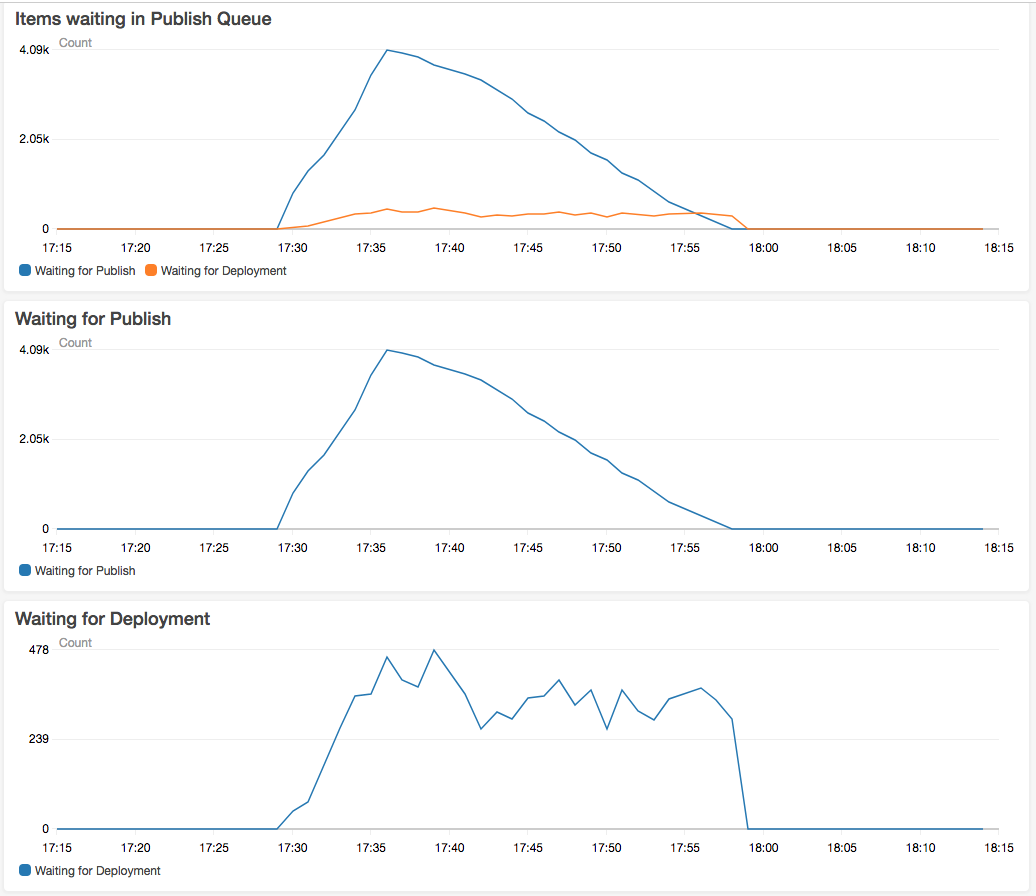
In order to define autoscaling of some servers, we need some metrics that we can use to create the autoscaling logic, i.e. when to spin up new instances and when to terminate them. A good measure for this, in Tridion terms, is the size of the Publishing Queue. Namely for Publishers autoscaling, it's useful to look at the number of items in the Publishing Queue that are in the state "Waiting for Publish".

The approach is to read this metric somehow from the Tridion Content Manager database and make it available in AWS, so that we can use it later. AWS CloudWatch provides a way to define and/or intercept events that can trigger some code execution. The code executed is supposed to read the Publishing Queue and push the count of items into CloudWatch as a custom metric.

1. Define Lambda Function

This function represents the code that is executed by the CloudWatch rule. The function reads the size of the Publishing Queue and pushes it as custom metrics into CloudWatch.

The languages available in AWS Lambda at the moment include .Net Core 1 and Python 2.7. I tried writing a nice .net application that uses Tridion's CoreService client to read the Publishing Queue metrics I needed. Unfortunately, I had to give this up after realizing the limitations in .Net Core 1 regarding connectivity to WCF services. Connecting to a service is really a big deal in 2017 -- you need a ton of DLLs!

Instead, I wrote the Lambda code in Python 2.7 using direct DB access to read the metrics from the Tridion CM DB. Definitely not the nicest approach, but it seems like the only way to do it. Also because the DB is an RDS instance in the same VPC, I wasn't too concerned with security.

After a few iterations and optimizations, the code looks like this:

fromosimport getenv
importpymssql
importboto3

client = boto3.client('cloudwatch')

defhandler(event, context):

server = getenv("PYMSSQL_SERVER")
user = getenv("PYMSSQL_USERNAME")
password = getenv("PYMSSQL_PASSWORD")
database = getenv("PYMSSQL_DB")

conn = pymssql.connect(server, user, password, database)
cursor = conn.cursor()
cursor.execute('select STATE, COUNT(*) from PUBLISH_TRANSACTIONS where STATE=1 or STATE=4 group by STATE')

metrics = {'Waiting for Publish': 0, 'Waiting for Deployment': 0}

for row in cursor.fetchall():
count = row[1]
if row[0] ==1:
metrics['Waiting for Publish'] = count
elif row[0] ==4:
metrics['Waiting for Deployment'] = count

print'Metrics', metrics

for metric in metrics:
response = client.put_metric_data(
Namespace='SDL Web',
MetricData=[
{
'MetricName': metric,
'Value': metrics[metric],
'Unit': 'Count',
},
]
)

conn.close()

I used environment variables in order to make the code more portable and clean. These variables are specified in the AWS console.

The code reads 2 values:
  • number of items in Waiting for Publish state;
  • number of items in Waiting for Deployment state;

Since I'm going to implement autoscaling for Deployers, I might as well read the relevant metrics in one go.

The code uses pymssql library to interact with CM DB. It also uses the boto3 CloudWatch client to push the custom metrics into CloudWatch.

2. Define Rule in CloudWatch

CloudWatch rules can be defined based on a time schedule (like a cron job) or based on events raised somewhere else.

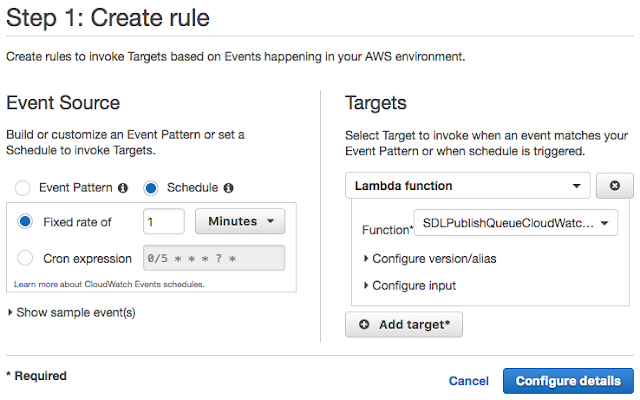
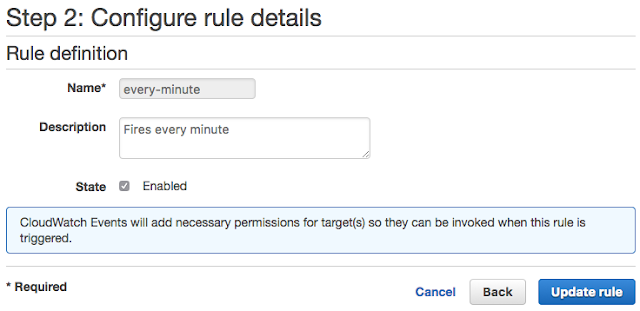
In this situation, a time pattern rule made sense. So I created a rule that fires every minute.

You also associate a target with the rule. This specifies what happens when the rule fires. In my case it executes the Lambda function created in step 1.


Give the rule a name and a description and save it.


3. Visualize Data in Dashboard

One can inspect the new custom metrics in CloudWatch and use them for creating alarms (presented in a later post) or place them in a dashboard like this:


CloudWatch Alarms

$
0
0
This post is part of a bigger topic Autoscaling Publishers in AWS.

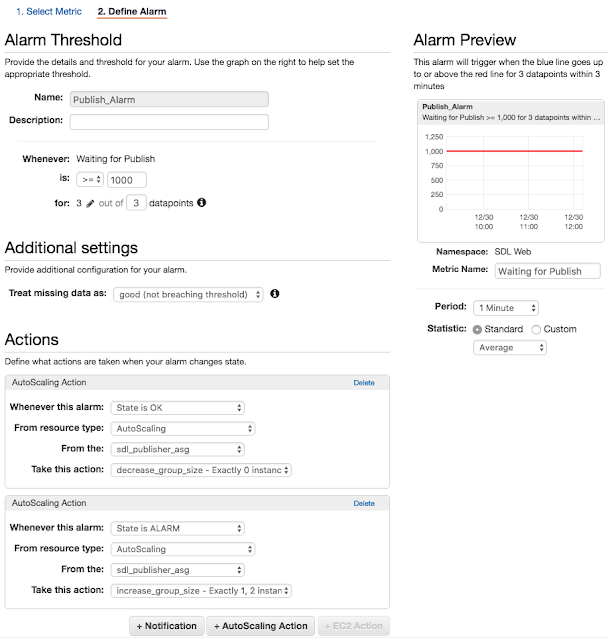
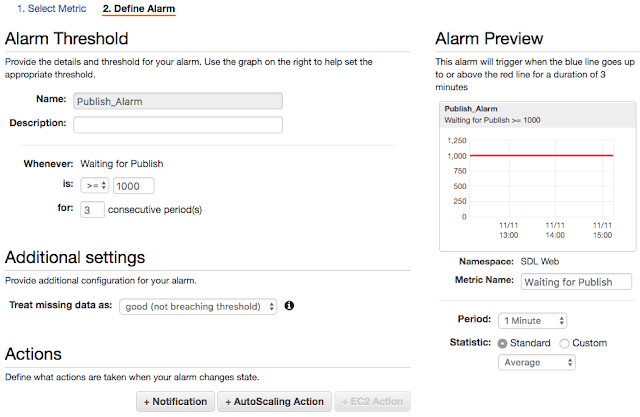
Autoscaling works based on some metrics. For Tridion Publishers we are going to define a Publish_Alarm in CloudWatch that uses the custom metric Waiting for Publish in order to trigger the alarm or not.

The alarm defines a threshold that, if passed, sets its state to ALARM. Otherwise, if the metric is below, it sets the state to OK.

Based on these states, one can define the Scaling Policies of an Auto Scale Group (more about this in a later post).

We are going to create an alarm that monitors the custom metric Waiting for Publish. In the first screen of creating the alarm, we select this metric.


On the second screen, we specify the threshold and the duration it takes to consider this alarm triggered. For example, I used a threshold of 1000 items that has to be surpassed for 3 consecutive readings (each reading happening at 1 minute interval).


We leave the Actions section empty for now. We will enter here the details of the Scaling Policy later.


Launch Configuration

$
0
0
This post is part of a bigger topic Autoscaling Publishers in AWS.

Each Auto Scaling Group in AWS is based on a Launch Configuration. The Launch Configuration cannot be modified once it's created, but it can however be copied and modified.

Once Auto Scaling is in place, the instances it creates will all be based on the specified Launch Configuration.

Creating a Launch Configuration implies specifying the AMI, the Instance Type, Security IAM role, EBS drive, security group and open incoming ports. All these are AWS settings and they don't make the object of this post.

What is particularly interesting is the section Configure details, subsection User data. This is where one can specify either a script of a file containing a script that will be executed inside the instance once it is created and it starts. Using this mechanism we created PowerShell scripts to configure each Publisher instance in part.

<powershell>
aws s3 cp s3://mybucket/scripts/publisher_userdata.ps1 D:\scripts\publisher_userdata.ps1
D:\scripts\publisher_userdata.ps1 2>&1 > D:\userdata.log
</powershell>

The implementation we used here is to copy a PowerShell script from an S3 bucket into the instance; then, execute the script inside the instance. This approach is flexible in the sense that one doesn't have to recreate the Launch Configuration in order to make modifications to the user data script.

The highlights of the script below show how the instance is configured. First the DNS is set on the server. Then a series of scripts are copied from S3 bucket to the local harddisk. The same mechanism is used to copy patches (jars, dlls, config files) when needed, without having to recreate the AMI.

The downloaded scripts are going to be executed on a subsequent reboot of the machine. During this initial execution, the machine is renamed to the name that has been extracted from the license server, but more about that in the following post.


$Logfile = "D:\tst.log"
Function LogWrite {
Param ([string]$logstring)
Add-content$Logfile -value $logstring
}
LogWrite("Start script...")

$message=""
function setDNS($DNSServers) {
try {
$NICs = Get-WMIObject Win32_NetworkAdapterConfiguration |where{$_.IPEnabled -eq"TRUE"}
Foreach($NICin$NICs) {
$message += $NIC.SetDNSServerSearchOrder(@($DNSServers)) | Out-String
}
} catch {}
}
setDNS($DNSServers)
echo "DNS settings done"
LogWrite("DNS changed.")

LogWrite("downloading resume scripts")
Rename-Item"D:\SDL Web\lib\cd_transport.jar" cd_transport.jar_old
aws s3 cp s3://mybucket/jar/cd_transport-8.5.0-1050.jar "D:\SDL Web\lib\cd_transport-8.5.0-1050.jar"
aws s3 cp s3://mybucket/scripts/resume-workflows.ps1 d:\scripts\resume-workflows.ps1
aws s3 cp s3://mybucket/scripts/resume-workflows.cmd d:\scripts\resume-workflows.cmd
aws s3 cp s3://mybucket/scripts/resume_powershell_workflows.xml d:\scripts\resume_powershell_workflows.xml
aws s3 cp s3://mybucket/scripts/join_ad.ps1 d:\scripts\join_ad.ps1
aws s3 cp s3://mybucket/scripts/cleanup.ps1 d:\scripts\cleanup.ps1
aws s3 cp s3://mybucket/scripts/dns.ps1 d:\scripts\dns.ps1
aws s3 cp s3://mybucket/scripts/run-change-dns.cmd d:\scripts\run-change-dns.cmd
aws s3 cp s3://mybucket/config/cd_transport_conf.xml "D:\SDL Web\config\cd_transport_conf.xml"
aws s3 cp s3://mybucket/config/Tridion.ContentManager.config "D:\SDL Web\config\Tridion.ContentManager.config"

LogWrite("Creating scheduled task")
SchTasks /Create /SC ONSTART /RL HIGHEST /RU SYSTEM /TN "Resume Powershell Workflows" /TR "d:\scripts\resume-workflows.cmd"

LogWrite("Renaming & Rebooting...")
Rename-Computer -NewName $license_hostname -Force -Restart


License Management

$
0
0
This post is part of a bigger topic Autoscaling Publishers in AWS.

Tridion Publishers need a license that matches the name of the host machine they run on. Each Publisher must have a different name. This means that when using autoscaling, we must know in advance which license to copy into the instance (at first start up time) and also we must rename that machine's hostname to match the license. This is needed because otherwise the instance machine name is always the one set in the AMI.

The script below executed by the Amazon Launch Configuration service when the publisher instance starts. It is backed by a database that contains the available licenses, each with a host name. The script takes the first license available and then changes the host name to match the name specified in the license.

Additionally, the script then downloads the correct license files from their s3 location and copies them in the right folder under the Tridion installation.

Finally the script instructs the server to join the Active Directory domain that is supposed to be part of. This logic is tricky, and sometimes it doesn't work within a single server restart. So two restarts might be needed: first to change the host name, then second to join the domain.

The license that is used is marked as 'unavailable', so the next instance of publisher that starts up cannot use the same license again. We will see in a later post that when a publisher is decommissioned, the license is marked as available again and the db table is updated accordingly.


$connectionString = "Server=$dataSource;uid=$user; pwd=$pwd;Database=$database;Integrated Security=False;"
$query = "SELECT * FROM licenses WHERE licenses.available = 'true' and licenses.type = 'publisher'"

$connection = New-Object System.Data.SqlClient.SqlConnection
$connection.ConnectionString = $connectionString
$connection.Open()

Write-Host"Begin SQL Transaction"
$transaction = $connection.BeginTransaction("LicenseTransaction")

$sqlCmd = New-Object System.Data.SqlClient.SqlCommand
$sqlCmd.CommandText = $query
$sqlCmd.Transaction = $transaction
$sqlCmd.Connection = $connection
$sqlReader = $sqlCmd.ExecuteReader()
$sqlReader.Read()

$license_id = $sqlReader["id"]
$license_hostname = $sqlReader["hostname"]
$license_file = $sqlReader["license_file"]
$license_cd_file = $sqlReader["license_cd_file"]

$sqlReader.close()

Write-Host$license_id
Write-Host$license_hostname
Write-Host$license_file
Write-Host$license_cd_file

$query_lock = "UPDATE licenses SET licenses.available = 'false' WHERE licenses.id = $license_id"
$sqlCmd.CommandText = $query_lock
$sqlCmd.Transaction = $transaction
$result = $SqlCmd.ExecuteNonQuery()
Write-Host"Result UPDATE: "$result

Write-Host"End Transaction"
$transaction.Commit()
$connection.Close()

LogWrite("New hostname selected.")
LogWrite($newHostName)

aws s3 cp $license_file"D:\SDL Web\bin\license.xml"
aws s3 cp $license_cd_file"D:\SDL Web\config\cd_licenses.xml"

echo "Selected hostname is: "$license_hostname
LogWrite("Creating Name tag...")
Set-DefaultAWSRegion$AWSRegion
$client = New-Object System.Net.WebClient
$instanceId = $client.DownloadString("http://169.254.169.254/latest/meta-data/instance-id")
$Tag = New-Object amazon.EC2.Model.Tag
$Tag.Key = "Name"
$Tag.Value = $license_hostname
New-EC2Tag -Resource $instanceId -Tag $Tag


Auto Scaling Group

$
0
0
This post is part of a bigger topic Autoscaling Publishers in AWS.

Now that we have a Launch Configuration, based on it, we can create an Auto Scaling Group. This will be in charge of creating/terminating publisher instances based on some rules (Scaling Policies).

We base our Auto Scaling Group on the Launch Configuration created earlier (sdl_publisher_lc). The very important properties are the Desired, Min and Max number of instances in the group. The Desired is set usually by the Scaling Policies, but more about those later. The Min and Max are the limits of this group. In my case I use Min=1 and Max=3, meaning that I want to have 1 publisher running at all times and when needed, based on load, 2 additional publishers can be added to the group by an 'Increasing size' Scaling Policy.

Once load passes, a 'Decreasing size' Scaling Policy reduces the number of instances in the group.


Scaling Policies

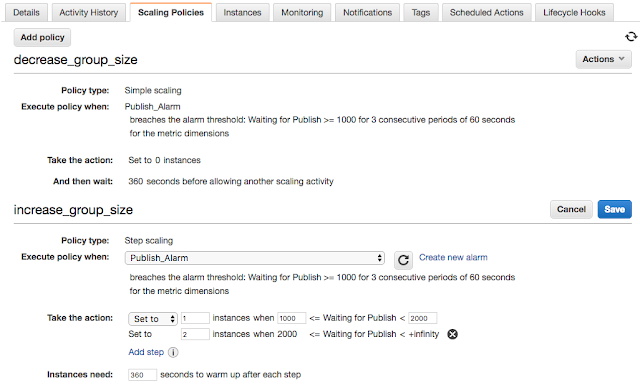
These policies represent the rules for adding/removing instances to the group. They can monitor metrics on the instance itself (e.g. CPU), CloudWatch metrics, or even CloudWatch alarms (e.g. Publish Alarm defined earlier) in order to increase and decrease the number of instances.

We define an 'increase_group_size' as a Scaling Policy with Steps in order to add more publisher instances as the size of the Publish Queue increases.

We also define a 'decrease_group_size' as Simple Scaling Policy that reduces the size of the group. But more details about these policies in a followup post.


Lifecycle Hooks

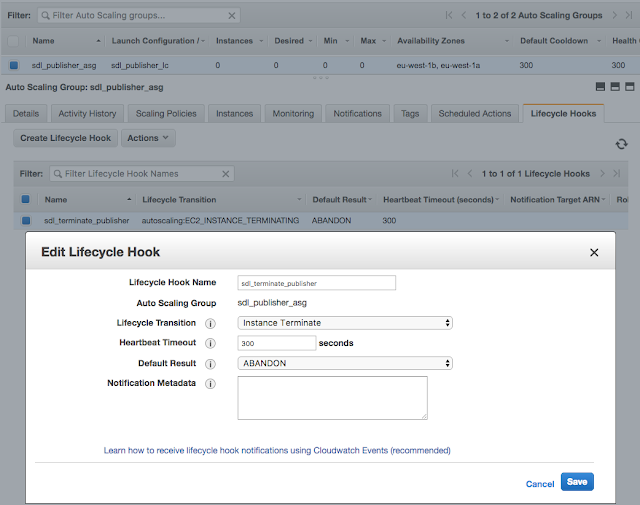
We are going to use a lifecycle hook when scaling-in (decreasing) the size of out group, when publishing load has passed.

More details about the termination hook in a later post. For now, we create one hook that is going to be raised when the group attempts to terminate an instance. This hook can be intercepted in a CloudWatch event that can then trigger a Lambda Function that will instruct the publisher to shutdown gracefully. Once that happens, the termination hook is released and termination occurs normally.

The Lifecycle Hook Name is important, because in our Lambda Function we will instruct this particular hook to continue termination.

Heartbeat Timeout specifies the time needed to this hook to expire. This means that in the case the termination Lambda did not release the hook in the meantime, the hook will be automatically released once this timeout expires.


Scaling Policies

$
0
0
This post is part of a bigger topic Autoscaling Publishers in AWS.

In a previous post we talked about the Auto Scaling Groups, but we didn't go into details on the Scaling Policies. This is the purpose of this blog post.

As defined earlier, the Scaling Policies define the rules according to which the group size is increased or decreased. These rules are based on instance metrics (e.g. CPU), CloudWatch custom metrics, or even CloudWatch alarms and their states and values.


We defined a Scaling Policy with Steps, called 'increase_group_size', which is triggered first by the CloudWatch Alarm 'Publish_Alarm' defined earlier. Also depending on the size of the monitored CloudWatch custom metric 'Waiting for Publish', the Scaling Policy with Steps can add a difference number of instances to the group.

The scaling policy sets the number of instances in group to 1 if there are between 1000 and 2000 items Waiting for Publish in the queue. It also sets the group size to 2 if there are more than 2000 items in the queue.

This logic expects the Alarm is in state ALARM first, and then depending on the items in Waiting for Publish, it will set the group size accordingly.

For the other Scaling Policy, called 'decrease_group_size', the logic is a bit different. This is a simple scaling policy, which sets the group size to 0 (removes all publishers) if the Publish_Alarm is in state OK.

To notice in the image above the logic is incorrect, and I suspect this has to do with the fact AWS GUI cannot display this setup. Instead, we need to go to the CloudWatch Alarm setup GUI and setup the logic there, as per screenshot below:


Note the Actions for this alarm: 2 AutoScaling Actions, one for increase and one for decrease of group size.

For the decrease action: whenever the alarm is in state OK, perform action 'decrease_group_size', which means terminate all instances in the group.

For the increase action, whenever the alarm is in state ALARM, perform actions according to scaling policy with steps 'increase_group_size'.


Terminate Lifecycle Hook

$
0
0
This post is part of a bigger topic Autoscaling Publishers in AWS.

In a previous post, I mentioned the LifeCycle Termination Hooks for our Auto Scaling Policy. In this post, we see more details about this hook and how it is actually used to gracefully shutdown service on the instance that is about to be terminated.

As per earlier post, we defined one termination hook in the Auto Scaling Policy, named 'sdl_terminate_publisher':


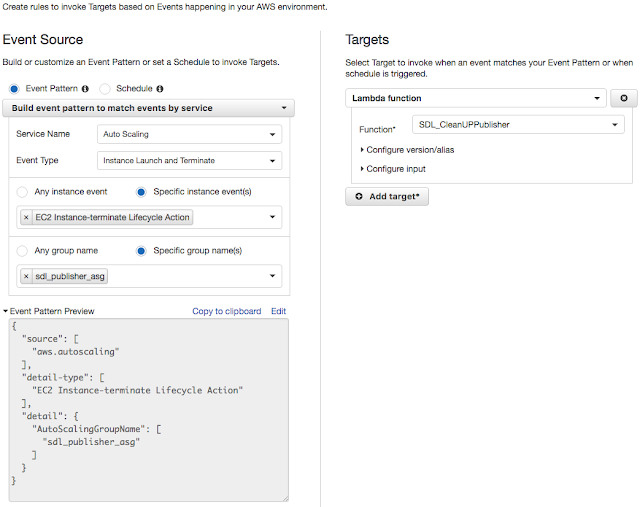
Next, we use this a CloudWatch event to execute a Lambda Function that performs the graceful shutdown of the Publisher service on the instance, and then releases the termination hook, so the instance can be terminated properly.

In CloudWatch, create a new Rule as per below:

  • Event Source: Event Pattern
  • Based on service: Auto Scaling
  • Event Type: Instance Launch and Terminate
  • Specific event: EC2 Instance-terminate Lifecycle Action
  • Specific group: sdl_publisher-asg
Target a Lambda function to be executed when this event triggers:
  • SDL_CleanUpPublisher


Lastly, we need the Lambda function that performs the actual graceful stopping of the Publisher service. This function uses the 'boto3' client to send a message to the instance to execute a cleanup script that was placed there in advance. The script stops the Publisher service, releases the license and removes the server from the AD domain.

The Lambda function does wait until the script execution finishes and only then releases the lifecycle termination hook, which then leads to the termination of the instance.

import boto3
import logging
import time

def lambda_handler(event, context):
message = event['detail']
instanceId = str(message['EC2InstanceId'])

ssmClient = boto3.client('ssm')
ssmCommand = ssmClient.send_command(
InstanceIds = [ instanceId ],
DocumentName = 'AWS-RunPowerShellScript',
TimeoutSeconds = 270,
Parameters = { 'commands': ['D:\\scripts\\cleanup.ps1'] },
OutputS3BucketName = 'sdl-log',
OutputS3KeyPrefix = 'CleanUpPublisher'
)

status = ssmCommand['Command']['Status']
while status == 'Pending' or status == 'InProgress':
time.sleep(3)
status = (ssmClient.list_commands(CommandId=ssmCommand['Command']['CommandId']))['Commands'][0]['Status']

actionResult = "CONTINUE"
if (status != 'Success'):
actionResult = "ABANDON"

asgClient = boto3.client('autoscaling')
lifeCycleHook = message['LifecycleHookName']
autoScalingGroup = message['AutoScalingGroupName']

response = asgClient.complete_lifecycle_action(
LifecycleHookName = lifeCycleHook,
AutoScalingGroupName = autoScalingGroup,
LifecycleActionResult = actionResult,
InstanceId = instanceId
)

return None


Below are the highlights of the 'cleanup.ps1' script invoked above:

Stop-Service TcmPublisher
Stop-Service TCDTransportService

$hostname = HostName
$database = "sdl_licenses"
$connectionString = "Server=$dataSource;uid=$user; pwd=$pwd;Database=$database;Integrated Security=False;"
$connection = New-Object System.Data.SqlClient.SqlConnection
$connection.ConnectionString = $connectionString
$connection.Open()
$query = "UPDATE licenses SET licenses.available = 'True' WHERE licenses.hostname = '$hostname'"
$command = $connection.CreateCommand()
$command.CommandText = $query
$adapter = New-Object System.Data.SqlClient.SqlDataAdapter $command
$dataset = New-Object System.Data.DataSet
$adapter.Fill($dataset) | out-null
$connection.Close()
echo "Unlocked"

$credential = New-Object System.Management.Automation.PSCredential($username,$password)
Remove-Computer -UnjoinDomainCredential $credential -ComputerName $hostname -Force -PassThru -Verbose
echo "Removed"


Using Elastic File System for Out-Scaled Deployers

$
0
0

In a scaled-out scenario for Content Delivery Deployers, it is possible to setup a shared file system as the Binary Storage medium for incoming transport packages.

The Deployer Receiver writes these transport package zip files into the Binary Storage folder. Then it is up to the Deployer Workers to read these zip files as they deployer/underploy the content.

Below, we present the configurations for an AWS Elastic File System (EFS) acting as storage medium for transport packages.

Start by simply creating an EFS in AWS console. This whole step might take you 5 minutes :)


AWS is going to generate a hostname where this file system is available and it will give instructions on how to mount it in your server.

For example, in Linux CentOS, one can mount an FS using the mount command. The following command will mount the EFS drive under folder /efs01 on the current server:


sudo mount -v -t nfs4 -o nfsvers=4.1,rsize=1048576,wsize=1048576,hard,timeo=600,retrans=2 fs-a17668.efs.eu-west-1.amazonaws.com:/ /efs01


Another way of performing permanent mounts, is to add the following line to file /etc/fstab:


fs-a17668.efs.eu-west-1.amazonaws.com:/ /efs01 nfs4 nfsvers=4.1,rsize=1048576,wsize=1048576,hard,timeo=600,retrans=2,_netdev 0 0

Once mounted, we can verify the EFS drive state issuing the following command:

mount | grep efs01

The response should look something like this:

fs-a17668.efs.eu-west-1.amazonaws.com:/ on /efs01 type nfs4 (rw,relatime,vers=4.1,rsize=1048576,wsize=1048576,namlen=255,hard,proto=tcp,timeo=600,retrans=2,sec=sys,clientaddr=10.10.2.173,local_lock=none,addr=10.10.2.145,_netdev)

At this moment, the EFS drive is ready and we can configure it in our deployer-conf.xml:


    <BinaryStorage Id="PackageStorage" Adapter="FileSystem">

        <Property Name="Path" Value="/efs01/deployer-queues"/>
    </BinaryStorage>

The same BinaryStorage node must be present on the Deployer Receiver as well as on all Deployer Workers.


Using ElastiCache (Redis) for Out-Scaled Deployers

$
0
0
In a scaled-out scenario for Content Delivery Deployers, it is possible to setup an AWS ElastiCache Redis DB as the Binary Storage medium for incoming transport packages.

The Deployer Receiver writes these transport package zip files into the Binary Storage Redis instance. Then it is up to the Deployer Workers to read these zip files as they deployer/underploy the content.

Below, we present the configurations for an AWS ElastiCache Redis acting as storage medium for transport packages.

Start by simply creating an ElastiCache Redis instance in AWS console. This whole step might take you 5 minutes :)


AWS will give you the hostname where the Redis DB is available and the port, usually 6379.

In your deployer-conf.xml, setup this Redis instance using the BinaryStorage node format as below:

    <BinaryStorage Id="RedisStorage" Adapter="RedisBlobStorage">
        <Property Name="Host" Value="10.10.2.232"/>
        <Property Name="Port" Value="6379"/>
        <Property Name="Timeout" Value="20000"/>
    </BinaryStorage>

Perform the setup both on the Deployer Receiver as well as on all Deployer Workers.

Note that the size of the transport package is limited to 512MB when using a Redis Binary Storage medium. This limitation is apparently given by Redis, which can't store more than 512MB in an entry.


Using File System Queues for Out-Scaled Deployers

$
0
0
When a Deployer Receiver receives a transport package, it notifies the Deployer Workers there is 'work' for them to do. This notification can take the form of files on a shared File System. The Deployer workers monitor the file system and upon noticing a change, they start deploying/undeploying the package.

In order to setup this File System notification system, we must first create a shared File System (shared across the Deployer Receiver and all Deployer Workers). In order to do that, have a look at an earlier post Using Elastic File System for Out-Scaled Deployers.

Once the EFS is in place, for example under folder /efs01, we can configure the Deployers to use this share file system in the file deployer-config.xml, as per below:

<Queues>
<QueueDefault="true"Verbs="Content"Adapter="FileSystem"Id="ContentQueue">
<PropertyName="Destination"Value="/efs01/deployer-queues"/>
<PropertyName="Workers"Value="30"/>
</Queue>
<QueueVerbs="Commit,Rollback"Adapter="FileSystem"Id="CommitQueue">
<PropertyName="Workers"Value="30"/>
</Queue>
<QueueVerbs="Prepare"Adapter="FileSystem"Id="PrepareQueue">
<PropertyName="Destination"Value="/efs01/deployer-queues"/>
<PropertyName="Workers"Value="30"/>
</Queue>
<AdapterId="FileSystem">
<PropertyName="LocationPollingInterval"Value="10s"/>
</Adapter>
</Queues>

Notice that the performance on this setup is low. At the moment of testing this, under high publishing loads, errors would be thrown regarding locking and unlocking files from the underlying file system.


Using Amazon SQS for Out-Scaled Deployers

$
0
0
When a Deployer Receiver receives a transport package, it notifies the Deployer Workers there is 'work' for them to do. This notification can take the form of JMS messages sent using some kinds of queuing mechanism. This post describes the Amazon Simple Queuing Service (SQS) to send these notifications. The Deployer workers receive these messages from SQS and they start deploying/undeploying the package.

In order to setup this notification system, we must first create the SQS queues and configure them across the Deployer Receiver and all Deployer Workers.

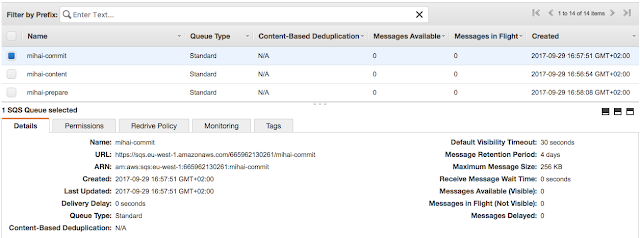
Start by creating Standard Queues using all default properties. We need 3 queues (commit, content, and prepare):


Once the SQS queues are in place, we can configure the Deployers to use them in the file deployer-config.xml. Amazon gives us the queues URLs. We need to specify the URL base separately, and then simply name the queues individually, as per below:

<Queues>
<QueueDefault="true"Verbs="Content"Adapter="JMS"Id="mihai-content">
<PropertyName="Workers"Value="16"/>
</Queue>
<QueueVerbs="Commit,Rollback"Adapter="JMS"Id="mihai-commit">
<PropertyName="Workers"Value="16"/>
</Queue>
<QueueVerbs="Prepare"Adapter="JMS"Id="mihai-prepare">
<PropertyName="Workers"Value="16"/>
</Queue>

<AdapterId="JMS">
<PropertyName="JMSConnectionFactoryBuilderClass"
Value="com.sdl.delivery.spring.configuration.jms.AmazonSQSConnectionFactoryBuilder"/>
<PropertyName="JMSUri"Value="https://sqs.eu-west-1.amazonaws.com/692321"/>
<PropertyName="Username"Value="username"/>
<PropertyName="Password"Value="password"/>
<PropertyName="ReceiveTimeout"Value="200"/>
</Adapter>
</Queues>

The properties Username and Password represent the AWS account credentials and they can be found in AWS user security settings.

The property Workers specifies the number of worker threads for each queue. Values that perform best are around 10-20 worker threads. Performance degrades using lower values and there isn't any significant performance gain when using higher values.


Fine-Tuning the Publishers-Deployers Infrastructure

$
0
0
In order to squeeze the most performance out of the publishing in a Tridion, SDL Web system, there is a high amount of parameters and configurations that must all be optimized. This post presents a few of these parameters, especially in the context of AWS infrastructure.

CME

The Tridion GUI, the Content Manager Explorer server is a normal Tridion installation, but with Publisher and Transport services disabled. This server is only used for running the website -- the CME.

Publishers

Publisher servers are Tridion installations without the CME. Namely these servers have the Publisher and Transport services enabled and any other Tridion services, if installed, are disabled. The purpose of a Publisher is simply to lookup publishable items in the Publishing Queue and proceed to render them, hand them over to the Transport service and have the transport package pushed to the Content Delivery.

Publishers should use approximately twice the number of CPU cores as number of rendering threads and the same number of cores are transporting threads. If more threads are used, typically no significant performance gain is achieved. Instead, it is better to scale-out the Publisher servers.

In AWS context, it is advisable to scale-out the Publishers to 2-4 instances in order to obtain optimal performance. Scaling out to more than 4 Publishers results in little to no performance gain achieved, mostly due to the limitations on database transactions and number of permitted I/O operations, but more about that below.

In terms of instance type, anything from t2.medium to m4.xlarge are advisable Publisher instance types. Some very interesting performance is achieved with several smaller type instances than with fewer larger instances.

Deployer Receiver

The receiver on transport packages on the Content Delivery side is this so called Deployer Receiver, which only listens to incoming HTTP connections that post transport packages and other admin/update notification requests.

A receiver is usually a light weight server, so smaller instances in the t2.large vicinity will do the job nicely.

It is possible to scale-out receivers, by placing them under an Elastic Load Balancer, in an active-active manner using normal round-robin requests allocation.

The location where deployers store the incoming transport packages can be configured to shared file system (e.g. EFS) or a Redis instance. Performance of Redis is better than shared file system. Also Redis is more reliable than shared file systems, because the latter are prone to locking issues under load. However, one bit limitation of Redis is that it can't store transport packages larger than 512MB. So rule of thumb: use Redis if possible, otherwise fall back to shared FS, for example EFS.

The notification mechanism the receiver uses to notify workers there are new available transport packages can be configured to use file system queues (e.g. EFS) or JMS (e.g. SQS or ActiveMQ). The file system queues have to exist on the shared file system and their performance is greatly impacted by the fact that the notification is not actually sent, rather the workers monitor a certain folder in order to detect changes in it. This is also prone to file locking issues and is in general less stable than a messaging system. Therefore the JMS implementation (e.g. SQS) is highly recommended here. The receiver will post a message to the SQS mechanism and that is relayed further to all listening worker servers.

Deployer Worker

This server is the one actually performing the deploy/undeploy of content. Upon noticing a transport package is available, it will proceed to handle it and return its status to the receiver.

The configuration that yields the best performance is to use Redis as binary storage, if possible, and to use JMS notification mechanism, such as SQS.

The worker server can be configured to use a number of threads that perform the deploying/undeploying internally. A good number if around 15 worker threads. Less than 10 will result in poor performance and more than 20 will not yield any noticeable performance gain.

In AWS context, the instance type of a deployer worker can range from t2.medium to m4.xlarge, with some very nice surprises for several smaller instances rather than fewer larger instances. A number of 2-3 instances are sufficient to yield great publishing throughputs.


sdl-healthcheck as Windows Service

$
0
0
This post describes how to convert the 'sdl-healthcheck' application to a Windows Service.

SDL-healthcheck is a Java application that creates a webservice around the SDL Web microservices in order to provide monitoring (heart beat) checks on them. Mark van der Wal wrote the application and provided startup and stop Shell scripts.

My requirement was to have the same application installable and executable as Windows Service.

Therefore, I had to wrap the Java application inside a service container and provide start, stop hooks for the service. I know that SDL Web Content Delivery microservices are also Java applications using Spring Boot, so my approach was to use the same mechanism to make the Java application run as Windows Service.

The service container used is 'procrun.exe' daemon from Apache Commons. Depending on the arguments passed to it, it can perform different Windows Service functionality such as install, remove service, start/stop service.

I ended up hacking together the installService PowerShell scripts from the CD microservices and they look like the ones below. One trick was to provide a StopClass and StopParams to the service. If a service should finish gracefully, then it should be programmed to do so. But I saw Mark was simply killing the process on his stop.sh script, so I ended up just calling java.lang.System.exit() method. This ensues the services stops when it is requested to do so.

installService.ps1

$jvmoptions = "-Xrs", "-Xms48m", "-Xmx128m", "-Dfile.encoding=UTF-8"

$currentFolder = Get-Location
$name="SDLHealthcheck"
$displayName="SDL Healthcheck"
$description="SDL Healthcheck"
$dependsOn=""
$path=$PSScriptRoot
cd $path\..
$rootFolder = Get-Location
$procrun="procrun.exe"
$application=$path + "\" + $procrun
$fullPath=$path + "\" + $procrun

$arguments = @()
$arguments += "//IS//" + $name
$arguments += "--DisplayName=" + $displayName
$arguments += "--Description=" + $description
$arguments += "--Install=" + $fullPath
$arguments += "--Jvm=auto"
$arguments += "--Startup=auto"
$arguments += "--LogLevel=Info"
$arguments += "--StartMode=jvm"
$arguments += "--StartPath=" + $rootFolder
$arguments += "--StartClass=org.springframework.boot.loader.JarLauncher"
$arguments += "--StartParams=start"
$arguments += "--StopMode=jvm"
$arguments += "--StopClass=java.lang.System"
$arguments += "--StopParams=exit"

$classpath = ".\bin\*;.\lib\*;.\addons\*;.\config"
foreach ($folderinGet-ChildItem -path $rootFolder -recurse | ?{ $_.PSIsContainer } | Resolve-Path -relative | Where { $_-match'services*' })
{
$classpath = $folder + ";" + $folder + "\*;" + $classpath
}
$arguments += "--Classpath=" + $classpath

# Check script is launched with Administrator permissions
$isAdministrator = ([Security.Principal.WindowsPrincipal] [Security.Principal.WindowsIdentity]::GetCurrent()).IsInRole([Security.Principal.WindowsBuiltInRole]"Administrator")
if ($isAdministrator-eq$False) {
$Host.UI.WriteErrorLine("ERROR: Please ensure script is launched with Administrator rights")
Exit
}

Try {
Write-Host"Installing '$name' as windows service..." -ForegroundColor Green
if (Get-Service$name -ErrorAction SilentlyContinue) {
Write-Warning"Service '$name' already exists in system."
} else {
& $application$arguments
Start-Sleep -s 3

if (Get-Service$name -ErrorAction SilentlyContinue) {
Write-Host"Service '$name' successfully installed." -ForegroundColor Green
} else {
$Host.UI.WriteErrorLine("ERROR: Unable to create the service '" + $name + "'")
Exit
}
}

if ((Get-Service$name -ErrorAction SilentlyContinue).Status -ne"Running") {
Write-Host"Starting service '$name'..." -ForegroundColor Green
& sc.exe start $name
} else {
Write-Host"Service '$name' already started." -ForegroundColor Green
}
} Finally {
cd $currentFolder
}


uninstallService.ps1

The following script will stop the service and then remove it:

function waitServiceStop {
param (
[string]$svcName
)
$svc = Get-Service$svcName
# Wait for 30s
$svc.WaitForStatus('Stopped', '00:00:30')
if ($svc.Status -ne'Stopped') {
$Host.UI.WriteErrorLine("ERROR: Not able to stop service " + $serviceName)
} else {
Write-Host"Service '$serviceName' is stopped." -ForegroundColor Green
}
}


# Check script is launched with Administrator permissions
$isAdministrator = ([Security.Principal.WindowsPrincipal] [Security.Principal.WindowsIdentity]::GetCurrent()).IsInRole([Security.Principal.WindowsBuiltInRole]"Administrator")
if ($isAdministrator-eq$False) {
$Host.UI.WriteErrorLine("ERROR: Please ensure script is launched with Administrator rights")
Exit
}

$currentFolder = Get-Location
$defaultServiceName="SDLHealthcheck"

try {
$scriptPath=$PSScriptRoot
cd $scriptPath\..
$rootFolder = Get-Location

$serviceName = $defaultServiceName

if (-Not (Get-Service$serviceName -ErrorAction SilentlyContinue)) {
$Host.UI.WriteErrorLine("ERROR: There is no service with name " + $serviceName)
Exit
}

Write-Host"Stopping service '$serviceName'..." -ForegroundColor Green
& sc.exe stop $serviceName
waitServiceStop $serviceName

Write-Host"Removing service '$serviceName'..." -ForegroundColor Green
& sc.exe delete $serviceName
if (-Not (Get-Service$serviceName -ErrorAction SilentlyContinue)) {
Write-Host"Service '$serviceName' successfully removed." -ForegroundColor Green
}
} Finally {
cd $currentFolder
}


Install ADFS Server and Relying Party

$
0
0
In the next series of blog posts, I am writing about securing SDL Web 8.5 (on-premise installation) against an Active Directory, through an ADFS (Active Directory Federation Service) server.

The goal is to have SDL Web 8.5 CME (the GUI) authenticate agains the ADFS server and also to have all web services that come with SDL Web authenticate against the same ADFS. Our setup is to have SDL Web in the cloud (AWS), connecting to an AD in a data center. The authentication with AD is exposed through some ADFS endpoints.

I installed the ADFS server using all default settings. What I'm focusing on in this post, is the creation of a Relying Party (or an application) that can request authentication tokens from the ADFS server.

The ADFS server is used in 2 modes:
  • passive authentication: a browser is redirected to ADFS to authenticate, then the browser is redirected back to the application with the authentication token in a header or POST body;
  • active authentication: a client calls ADFS directly with username/password to get the authentication token, then passes the token to the service it calls;
I will use ADFS passive authentication for the SDL Web CME and ADFS active authentication for the SDL Web web-services such as CoreService, TemplateUpload service, Workflow service, WebDAV connector, ImportExport service, etc.

The ADFS properties is presented in the screenshot below. We are going to use the Federation Service Identifier for our passive authentication method.


In ADFS, I create a Relying Party (the SDL Web Tridion application) running on server web85.playground. This is the remote application that is allowed to connect and authenticate with the ADFS server.

The Relying Party can use both active and passive authentication against the ADFS. The communication between SDL Web and ADFS is done over HTTPS. In the following screen, we define some "Relying party identifiers", which are simply some logical names in the format of a URL that identify the remote application requesting tokens from ADFS:


The token issued by ADFS is in SAML format, using SSL encryption for the sensitive information inside it (e.g. user account, user roles). The following screen defines the certificate with the public key the ADFS server uses when it encrypts SAML tokens to be sent back to the Relying Party (i.e. Tridion application). On the Tridion application (web85.playground server) there must installed the same certificate with private key in order to be able to decrypt the SAML token:


In the following screen, we define the "post back URL" on the SDL Web server that the ADFS server calls when posting back the token in passive authentication mode. The Tridion CME redirects the browser to the ADFS form login page where ADFS takes the username/password of the user. Upon successful login, the ADFS server issues a token that it attaches to a POST request back to the SDL Web CME:


The following screen defines the SDL Web CME endpoint that ADFS posts the encrypted token to upon a successful login:


Finally, this is out Relying Party application we just created:


Next, we need to define which attributes from Active Directory we want the SAML token to contain. These are called claims and they are encrypted in the SAML token. It is the responsibility of the Relying Party application (SDL Web CME in this case) to decrypt these claims and use the user name in the claim to impersonate the Tridion user using the Single Sign-On module.

In ADFS, we create a Claim Provider Trust, and in it one or more rules defining the attributes and their format to send as claims:


If we want to send back Active Directory attributes, without transforming them, we can create the following rule:


If we want to send claims and transform them, we can create some simple transforming rules. For example, the rule below sends the "Windows account name" (i.e. the fully qualified domain name \ username) as a "Name" claim. This is important for when we deserialize the claims, because based on their 'Outgoing claim type' they are used to create an Identity object (at least in .NET) containing the user attributes such as name, first name, last name, email, roles, etc...


Eventually, our ADFS forms-login page looks like the one below:


Note: the login page in ADFS cannot be accessed directly. It only displays if the request POSTs to it using one of the defined Relying Party identifiers.


Viewing all 215 articles
Browse latest View live